
本文总结一下RecyclerView提供的滑动相关的api,并探究一下为什么有的滑动方法不会回调监听 onScrollStateChanged(int state)
RecyclerView scroll 相关API有:
- scrollTo(int x, int y)
- scrollBy(int x, int y)
- scrollToPosition(int position)
- smoothScrollBy(@Px int dx, @Px int dy) 及其重载方法
- smoothScrollToPosition(int position)
- 当然,还有手势滑动
RecyclerView 通过 addOnScrollListener(OnScrollListener)监听滑动事件
RecyclerView 调用这个方法通知layoutmanager,scroll状态已经改变
public void onScrollStateChanged(int state) {
super.onScrollStateChanged(recyclerView, newState);
if (state == SCROLL_STATE_IDLE) {
//滑动停止
}
}
public void onScrolled(RecyclerView recyclerView, int dx, int dy) {
super.onScrolled(recyclerView, dx, dy);
//...
}
但是并不是所有的滑动行为都会回调到 onScrollStateChanged ,下面来一一分析下每个滑动场景
scrollTo 和 scrollBy
scrollTo 和 scrollBy 是 View 相关方法,实现的是 View 内容的滑动,效果是 View 控件本身并没有滑动,而是控件上绘制的内容在控件范围内发生滑动。
看下在 RecyclerView 里面的实现:// RecyclerView
public void scrollTo(int x, int y) {
// RecyclerView 不支持滚动到绝对位置,尝试使用 scrollToPosition 替换
Log.w(TAG, "RecyclerView does not support scrolling to an absolute position. "
+ "Use scrollToPosition instead");
}
public void scrollBy(int x, int y) {
// 这个方法可以配合实现 NestedScrollingChild 的控件联动
if (mLayout == null) {
Log.e(TAG, "Cannot scroll without a LayoutManager set. "
+ "Call setLayoutManager with a non-null argument.");
return;
}
if (mLayoutSuppressed) {
return;
}
final boolean canScrollHorizontal = mLayout.canScrollHorizontally();
final boolean canScrollVertical = mLayout.canScrollVertically();
if (canScrollHorizontal || canScrollVertical) {
scrollByInternal(canScrollHorizontal ? x : 0, canScrollVertical ? y : 0, null);
}
}
scrollByInternal 介绍
scrollByInternal后面在处理手势拖动的时候也会用到,继续往下看:// RecyclerView
boolean scrollByInternal(int x, int y, MotionEvent ev) {
int unconsumedX = 0;
int unconsumedY = 0;
int consumedX = 0;
int consumedY = 0;
consumePendingUpdateOperations();
if (mAdapter != null) {
mReusableIntPair[0] = 0;
mReusableIntPair[1] = 0;
// 这里处理滑动
scrollStep(x, y, mReusableIntPair);
consumedX = mReusableIntPair[0];
consumedY = mReusableIntPair[1];
unconsumedX = x - consumedX;
unconsumedY = y - consumedY;
}
// ... 分发 nestedscroll 结果
dispatchNestedScroll(consumedX, consumedY, unconsumedX, unconsumedY, mScrollOffset,
TYPE_TOUCH, mReusableIntPair);
// ... 通知 onScrolled 事件
if (consumedX != 0 || consumedY != 0) {
dispatchOnScrolled(consumedX, consumedY);
}
// ...
}
dispatchOnScrolled 会通知 onScrolled 的监听者
scrollStep方法,如下:// RecyclerView
void scrollStep(int dx, int dy, @Nullable int[] consumed) {
// ...
int consumedX = 0;
int consumedY = 0;
if (dx != 0) { // 调用LayoutManager处理滑动
consumedX = mLayout.scrollHorizontallyBy(dx, mRecycler, mState);
}
if (dy != 0) {
consumedY = mLayout.scrollVerticallyBy(dy, mRecycler, mState);
}
// ...
}
LayoutManager.scrollHorizontallyBy 介绍
本文以下都以 LinearLayoutManager 为例,继续看scrollHorizontallyBy 方法:
// LinearLayoutManager |
mOrientationHelper是LinearLayoutManager 类的一个全局变量,初始化是在:// LinearLayoutManager
public void setOrientation(@RecyclerView.Orientation int orientation) {
if (orientation != HORIZONTAL && orientation != VERTICAL) {
throw new IllegalArgumentException("invalid orientation:" + orientation);
}
assertNotInLayoutOrScroll(null);
if (orientation != mOrientation || mOrientationHelper == null) {
mOrientationHelper =
OrientationHelper.createOrientationHelper(this, orientation);
mAnchorInfo.mOrientationHelper = mOrientationHelper;
mOrientation = orientation;
requestLayout();
}
}
继续往下看:// abstract class OrientationHelper
public static OrientationHelper createOrientationHelper(
RecyclerView.LayoutManager layoutManager, @RecyclerView.Orientation int orientation) {
switch (orientation) {
case HORIZONTAL:
return createHorizontalHelper(layoutManager);
case VERTICAL:
return createVerticalHelper(layoutManager);
}
throw new IllegalArgumentException("invalid orientation");
}
以HORIZONTAL 方向为例:public static OrientationHelper createHorizontalHelper(
RecyclerView.LayoutManager layoutManager) {
return new OrientationHelper(layoutManager) {
public int getEndAfterPadding() {
return mLayoutManager.getWidth() - mLayoutManager.getPaddingRight();
}
public int getEnd() {
return mLayoutManager.getWidth();
}
public void offsetChildren(int amount) {
// 最终还是调用的全局变量 mLayoutManager 的 offsetChildrenHorizontal 方法
mLayoutManager.offsetChildrenHorizontal(amount);
// 垂直方向调用的就是下面的方法:
// mLayoutManager.offsetChildrenVertical(amount);
}
//...
}
}
private OrientationHelper(RecyclerView.LayoutManager layoutManager) {
mLayoutManager = layoutManager;
}
mLayoutManager 作为 OrientationHelper 构造方法的唯一参数。
点击mLayoutManager.offsetChildrenHorizontal(amount) 方法,跳转到的是RecyclerView.LayoutManger的方法:// RecyclerView.LayoutManger
public void offsetChildrenHorizontal(@Px int dx) {
if (mRecyclerView != null) {
mRecyclerView.offsetChildrenHorizontal(dx);
}
}
回到RecyclerView的这个方法:public void offsetChildrenHorizontal(@Px int dx) {
final int childCount = mChildHelper.getChildCount();
for (int i = 0; i < childCount; i++) {
// getChildAt返回的是每个child view
mChildHelper.getChildAt(i).offsetLeftAndRight(dx);
}
}
View.offsetLeftAndRight 介绍
经过上面的跳转步骤,最终发现会调用到列表里每个View的 offsetLeftAndRight 方法:// View
public void offsetLeftAndRight(int offset) {
if (offset != 0) {
final boolean matrixIsIdentity = hasIdentityMatrix();
if (matrixIsIdentity) {
if (isHardwareAccelerated()) {
invalidateViewProperty(false, false);
} else {
final ViewParent p = mParent;
if (p != null && mAttachInfo != null) {
final Rect r = mAttachInfo.mTmpInvalRect;
int minLeft;
int maxRight;
if (offset < 0) {
minLeft = mLeft + offset;
maxRight = mRight;
} else {
minLeft = mLeft;
maxRight = mRight + offset;
}
r.set(0, 0, maxRight - minLeft, mBottom - mTop);
p.invalidateChild(this, r);
}
}
} else {
invalidateViewProperty(false, false);
}
mLeft += offset;
mRight += offset;
mRenderNode.offsetLeftAndRight(offset);
if (isHardwareAccelerated()) {
invalidateViewProperty(false, false);
invalidateParentIfNeededAndWasQuickRejected();
} else {
if (!matrixIsIdentity) {
invalidateViewProperty(false, true);
}
invalidateParentIfNeeded();
}
notifySubtreeAccessibilityStateChangedIfNeeded();
}
}
这里RecyclerView的每个子View都是通过改变子 View 的 mLeft、mTop 等坐标,将初始位置值及偏移量传入,即需要滑动到的位置的坐标完成滑动。
这里的 mLeft、mTop是指基于父控件的视图坐标系中的坐标
Android 中有两种坐标系:
- 一种是视图坐标系,以当前控件左上角为坐标原点,向右为 X 轴正方向,向下为 Y 轴正方向,MotionEvent 的 getX()、getY() 方法获取的是点击位置在视图坐标系中的坐标。
- 另一种是 Android 坐标系,以屏幕左上角为坐标原点,向右为 X 轴正方向,向下为 Y 轴正方向,MotionEvent 的 getRawX()、getRawY() 方法获取的是点击位置在 Android 坐标系中的坐标
小结
小结一下,scorllBy 方法通知了onScrolled 回调,但是没有通知 onScrollStateChanged 回调
额外补充一点RecyclerView的布局过程,看上面scrollBy 里调用的 fill 方法// LinearLayoutManager
// fill填充方法, 返回的是填充ItemView需要的像素,以便拿去做滚动
int fill(RecyclerView.Recycler recycler, LayoutState layoutState,
RecyclerView.State state, boolean stopOnFocusable) {
// 填充起始位置
final int start = layoutState.mAvailable;
if (layoutState.mScrollingOffset != LayoutState.SCROLLING_OFFSET_NaN) {
//如果有滚动就执行一次回收
recycleByLayoutState(recycler, layoutState);
}
// 计算剩余可用的填充空间
int remainingSpace = layoutState.mAvailable + layoutState.mExtraFillSpace;
// 用于记录每一次while循环的填充结果
LayoutChunkResult layoutChunkResult = mLayoutChunkResult;
// ================== 核心while循环 ====================
while ((layoutState.mInfinite || remainingSpace > 0) && layoutState.hasMore(state)) {
// ====== 填充itemView核心填充方法 ====== 屏幕还有剩余可用空间并且还有数据就继续执行
layoutChunk(recycler, state, layoutState, layoutChunkResult);
// ...
}
// 填充完成后修改起始位置
return start - layoutState.mAvailable;
}
这个方法是用来填充内容的,更多布局过程可以参考这篇文章:《图文详解LinearLayoutManager填充、测量、布局过程》
scrollToPosition
再来看下 scrollToPosition,这个方法会使 RecyclerView 滚动最小的距离,以使目标位置可见,如果目标位置的view没有创建,则滑动不会发生
// RecyclerView.java |
这个方法调用了LayoutManager的同名方法:
// LinearLayoutManager.java |
requestLayout(),会重走onMeasure, onLayout过程,在 RecyclerView 的 dispatchLayoutStep1() 中 会调用onLayoutChildren()方法。
同时 LinearLayoutManager 重写了onLayoutChildren方法// LinearLayoutManager.java
public void onLayoutChildren(RecyclerView.Recycler recycler, RecyclerView.State state) {
// layout algorithm: 布局算法
// 1) by checking children and other variables, find an anchor coordinate and an anchor item position.
// 通过检查孩子和其他变量,找到锚坐标和锚点项目位置 mAnchor为布局锚点 理解为不具有的起点.
// mAnchor包含了子控件在Y轴上起始绘制偏移量(coordinate),ItemView在Adapter中的索引位置(position)和布局方向(mLayoutFromEnd)
// 2) fill towards start, stacking from bottom 开始填充, 从底部堆叠
// 3) fill towards end, stacking from top 结束填充,从顶部堆叠
// 4) scroll to fulfill requirements like stack from bottom. 滚动以满足堆栈从底部的要求
// resolve layout direction 设置布局方向(VERTICAL/HORIZONTAL)
resolveShouldLayoutReverse();
// ...
final View focused = getFocusedChild();
if (!mAnchorInfo.mValid || mPendingScrollPosition != RecyclerView.NO_POSITION
|| mPendingSavedState != null) {
// mPendingScrollPosition 值已更新,会进到这里
mAnchorInfo.reset();
// mStackFromEnd需要我们开发者主动调用,不然一直未false
// VERTICAL方向为mLayoutFromEnd为false HORIZONTAL方向是为true
mAnchorInfo.mLayoutFromEnd = mShouldReverseLayout ^ mStackFromEnd;
// 计算更新保存绘制锚点信息
updateAnchorInfoForLayout(recycler, state, mAnchorInfo);
mAnchorInfo.mValid = true;
} else if (focused != null && (mOrientationHelper.getDecoratedStart(focused)
>= mOrientationHelper.getEndAfterPadding()
|| mOrientationHelper.getDecoratedEnd(focused)
<= mOrientationHelper.getStartAfterPadding())) {
mAnchorInfo.assignFromViewAndKeepVisibleRect(focused, getPosition(focused));
}
// ... 如果 mPendingScrollPosition 有效,则会在 prelayout 阶段在用到这个值
if (state.isPreLayout() && mPendingScrollPosition != RecyclerView.NO_POSITION
&& mPendingScrollPositionOffset != INVALID_OFFSET) {
final View existing = findViewByPosition(mPendingScrollPosition);
if (existing != null) {
final int current;
final int upcomingOffset;
if (mShouldReverseLayout) {
current = mOrientationHelper.getEndAfterPadding()
- mOrientationHelper.getDecoratedEnd(existing);
upcomingOffset = current - mPendingScrollPositionOffset;
} else {
current = mOrientationHelper.getDecoratedStart(existing)
- mOrientationHelper.getStartAfterPadding();
upcomingOffset = mPendingScrollPositionOffset - current;
}
if (upcomingOffset > 0) {
extraForStart += upcomingOffset;
} else {
extraForEnd -= upcomingOffset;
}
}
}
// ...省略根据布局方向调用 fill 方法填充
}
// 更新 anchorInfo
private boolean updateAnchorFromPendingData(RecyclerView.State state, AnchorInfo anchorInfo) {
//...
// 简单理解,如果位置大于itemCount,不会更新 anchorInfo,并且清除 mPendingScrollPosition 的值
if (mPendingScrollPosition < 0 || mPendingScrollPosition >= state.getItemCount()) {
mPendingScrollPosition = RecyclerView.NO_POSITION;
mPendingScrollPositionOffset = INVALID_OFFSET;
if (DEBUG) {
Log.e(TAG, "ignoring invalid scroll position " + mPendingScrollPosition);
}
return false;
}
// ...
}
小结
上面代码可以看出,如果scrollToPosition(position) 的参数 position 所在位置还没有view被layout,则滑动不会被处理。
同时也可以看出 scrollToPosition 是 LayoutManager 通过 requestLayout 方式来刷新 ReycclerView,所以并不会通知 onScrollStateChanged
这里额外介绍一下根据 mAnchor 和布局方向填充view的逻辑
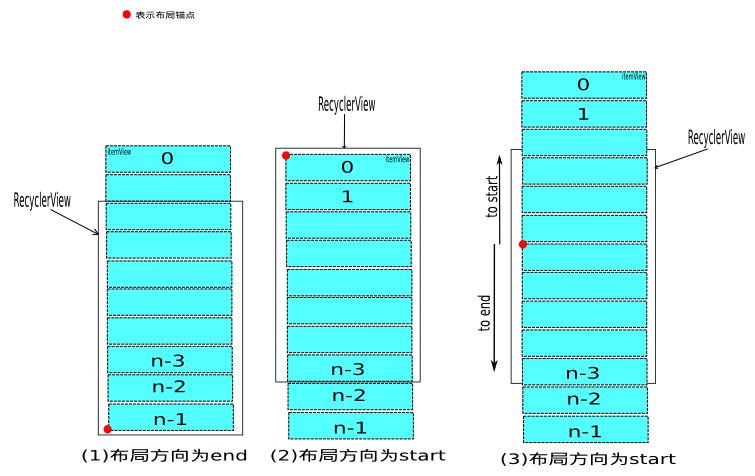
圆形红点就是我们布局算法在第一步updateAnchorInfoForLayout方法中计算出来的填充锚点位置。
- 第一种情况是屏幕显示的位置在RecyclerView的最底部,那么就只有一种填充方向为formEnd
- 第二种情况是屏幕显示的位置在RecyclerView的顶部,那么也只有一种填充方向为formStart
- 第三种情况应该是最常见的,屏幕显示的位置在RecyclerView的中间,那么填充方向就有formEnd和formStart两种情况,这就是 fill 方法调用两次的原因。
上面是RecyclerView的方向为VERTICAL的情况,当为HORIZONTAL方向的时候填充算法是不变的。
smoothScrollBy
smoothScrollBy有很多重载方法,直接看最终的:
// RecyclerView.java |
最终调用了mViewFlinger.smoothScrollBy 方法:// ViewFlinger.smoothScrollBy
public void smoothScrollBy(int dx, int dy, int duration,
@Nullable Interpolator interpolator) {
// Handle cases where parameter values aren't defined.
if (duration == UNDEFINED_DURATION) {
duration = computeScrollDuration(dx, dy, 0, 0);
}
if (interpolator == null) {
interpolator = sQuinticInterpolator;
}
// If the Interpolator has changed, create a new OverScroller with the new
// interpolator.
if (mInterpolator != interpolator) {
mInterpolator = interpolator;
mOverScroller = new OverScroller(getContext(), interpolator);
}
// Reset the last fling information.
mLastFlingX = mLastFlingY = 0;
// 调用RecyclerView的setScrollState方法,通知滑动事件开始
setScrollState(SCROLL_STATE_SETTLING);
mOverScroller.startScroll(0, 0, dx, dy, duration);
if (Build.VERSION.SDK_INT < 23) {
mOverScroller.computeScrollOffset();
}
postOnAnimation();
}
小结
smoothScrollBy 调用了 RecyclerView.setScrollState方法,最终会通知 onScrollStateChanged 的监听
smoothScrollToPosition
再来看下 smoothScrollToPosition// RecyclerView.java
public void smoothScrollToPosition(int position) {
if (mLayoutSuppressed) {
return;
}
if (mLayout == null) {
Log.e(TAG, "Cannot smooth scroll without a LayoutManager set. "
+ "Call setLayoutManager with a non-null argument.");
return;
}
mLayout.smoothScrollToPosition(this, mState, position);
}
上面直接调用了LayoutManager的同名方法// LinearLayoutManager.java
public void smoothScrollToPosition(RecyclerView recyclerView, RecyclerView.State state,
int position) {
LinearSmoothScroller linearSmoothScroller =
new LinearSmoothScroller(recyclerView.getContext());
linearSmoothScroller.setTargetPosition(position);
startSmoothScroll(linearSmoothScroller);
}
可以看到每次调用方法,都会创建一个LinearSmoothScroller,LinearSmoothScroller的父类是RecyclerView.SmoothScroller
最终调用的是 mRecyclerView.mViewFlinger.postOnAnimation();
ViewFlinger其实一个Runnable,在postOnAnimation()内部又将该Runnable发送出去了
那么我们在看下ViewFlinger的run()方法就行了。// RecyclerView.ViewFlinger
public void run() {
// ...
final OverScroller scroller = mScroller;
//获得layoutManger中的SmoothScroller
final SmoothScroller smoothScroller = mLayout.mSmoothScroller;
if (scroller.computeScrollOffset()) {//如果是第一次走,会返回false
// ...省略部分代码
if (mAdapter != null) {
mReusableIntPair[0] = 0;
mReusableIntPair[1] = 0;
scrollStep(unconsumedX, unconsumedY, mReusableIntPair);
consumedX = mReusableIntPair[0];
consumedY = mReusableIntPair[1];
// ...
}
if (consumedX != 0 || consumedY != 0) {
dispatchOnScrolled(consumedX, consumedY);
}
}
if (smoothScroller != null) {
if (smoothScroller.isPendingInitialRun()) {
smoothScroller.onAnimation(0, 0);
}
if (!mReSchedulePostAnimationCallback) {
smoothScroller.stop(); //stop if it does not trigger any scroll
}
}
// ...
}
小结
可以看出在ViewFlinger 的 run()方法中,调用了dispatchOnScrolled(consumedX, consumedY),通知了onScrolled()
真正产生滑动距离consumedX、consumedY 的方法是 scrollStep() 。这个方法前面分析 scrollBy()方法的时候已经分析过了,最终会调用到每个view的offsetLeftAndRight()方法。
补充滚到到一个屏幕外的位置
scrollToPosition 和 smoothScrollToPosition 只能保证指定位置的item滑动到屏幕可见,如果指定的item本来就已在屏幕可见范围,则不会滑动,并且屏幕外的item滑到可见范围后,还需手动置顶,手动置顶可以调用 LinearLayoutManager.scrollToPositionWithOffset(position, 0)recyclerView.scrollToPosition(pos);
linearLayoutManager.scrollToPositionWithOffset(pos, 0)
还可以使用另一种方式:
可以继承 LinearSmoothScroller,重写getVerticalSnapPreference()或getHorizontalSnapPreference()getVerticalSnapPreference()// LinearSmoothScroller
protected int getHorizontalSnapPreference() {
return mTargetVector == null || mTargetVector.x == 0 ? SNAP_TO_ANY :
mTargetVector.x > 0 ? SNAP_TO_END : SNAP_TO_START;
}
protected int getVerticalSnapPreference() {
// 子view与RecyclerView垂直方向顶部对齐
return SNAP_TO_START;
}
之后这样调用就可以:final TopSmoothScroller mTopScroller = new TopSmoothScroller(this);
mTopScroller.setTargetPosition(position);
mRecyclerView.getLayoutManager.startSmoothScroll(mTopScroller);
补充 scrollToPositionWithOffset
这个方式是LinearLayoutManager才有的方法,RecyclerView没有。
RecyclerView可以调用的是LinearLayoutManger.scrollToPosition(position)
这两个方法区别是区别是RecyclerView.scrollToPosition(position) 的 mPendingScrollPositionOffset 值为 INVALID_OFFSET = Integer.MIN_VALUEpublic void scrollToPositionWithOffset(int position, int offset) {
mPendingScrollPosition = position;
mPendingScrollPositionOffset = offset;
if (mPendingSavedState != null) {
mPendingSavedState.invalidateAnchor();
}
requestLayout();
}
前面也提到过了,这个方法第二个参数传0,可以让 position 位置对应的view置顶
同样这个方法是 LayoutManager 通过 requestLayout 方式来刷新 ReycclerView,所以并不会通知 onScrollStateChanged。
手势滑动
手势处理肯定是在RecyclerView的onTouchEvent方法中了:
|
小结
这里分两种情况:
- 没有触发fling操作,直接调用scrollByInternal()方法,最终调用View的offsetLeftAndRight(offset)方法。
- 触发fling操作,由mViewFlinger.fling(velocityX, velocityY)处理,最终在 mViewFlinger的run()方法中,调用View的offsetLeftAndRight(offset)方法。
总结
看到这里不知道大家有没有被绕晕,其实不管方法是哪个,都是调用每个子View的offsetLeftAndRight(offset)来实现列表的滑动
| scrollTo | scrollBy | scrollToPosition | smoothScrollBy | smoothScrollToPosition | |
|---|---|---|---|---|---|
| onScrolled | 无反应 | 触发 | 位置可见无反应, 否则触发 |
触发 | 位置可见无反应, 否则触发 |
| onScrollStateChanged | 无反应 | 无反应 | 无反应 | 触发 | 位置可见无反应, 否则触发 |
手势滑动两者都会触发,只不过因为放不下了,没有在表格里展示 :)
REF
图文详解LinearLayoutManager填充、测量、布局过程: https://www.jianshu.com/p/e9752f8890c8
View 的滑动原理和实现方式 : https://www.jianshu.com/p/a177869b0382
用SmoothScroller实现RecyclerView滚动到指定位置并置顶: https://blog.csdn.net/weixin_39428125/article/details/89032646

本文链接:http://agehua.github.io/2020/12/04/RecyclerView_scroll_relatedapi/

