Android View测量原理
public class DecorView extends FrameLayout implements RootViewSurfaceTaker, WindowCallbacks { |
我们知道DecorView是继承自FrameLayout,而且FrameLayout本身也比较简单,所以本文打算从FrameLayout的角度来分析view的measure过程。
View的根布局
每个Activity都要重写onCreate方法,通常是调用setContentView来设置当前Activity的布局。那么每个Activity布局是放在了哪里呢?传说中的根布局到底是什么呢?
一起往下看吧。
public void onCreate(Bundle savedInstanceState) {
super.onCreate(savedInstanceState);
setContentView(R.layout.activity_main);
}
进入setContentView的方法里面:
public void setContentView(int layoutResID) { |
getWindow()会返回一个继承Window的PhoneWindow(TV的话,会是TVWindow),然后执行它的setContentView(),而如下所示,PhoneWindow是在Activity的attach()中通过makeNewWindow生成的
final void attach(Context context, ActivityThread aThread, |
PolicyManager通过反射得到了Policy,如下
public final class PolicyManager { |
在Policy中的makeNewWindow()直接返回了一个PhoneWindow
public Window makeNewWindow(Context context) { |
下面就说到了,上面提的setContentView()
public class PhoneWindow extends Window implements MenuBuilder.Callback { |
到这里我们可以看出,就是将我们自己传进来的layoutId,添加到mContentParent下面,而这个mContentParent是在installDecor()里面赋值的,首先会初始化成员变量DecorView类的mDecor,然后调用generateLayout(),传入DecorView,来得到mContentParent。private void installDecor() {
if (mDecor == null) {
mDecor = generateDecor();
// 省省省……
}
if (mContentParent == null) {
mContentParent = generateLayout(mDecor);
// 省省省……
}
// 省省省……
}
protected DecorView generateDecor(int featureId) {
// 省略context创建过程,主要是避免依赖到activity的context
return new DecorView(context, featureId, this, getAttributes());
}
protected ViewGroup generateLayout(DecorView decor) {
// 省去巨量代码……
ViewGroup contentParent = (ViewGroup)findViewById(ID_ANDROID_CONTENT);
// 省去一些代码……
}
在generateLayout()中,会根据不同的Style类型来选择不同的布局文件,然后会add进DecorView中,然后调用findViewById()从DecorView里面得到mContentParent,这个才是真正的根布局,一般情况下,根布局都是FrameLayout来担任,我们可以用xml的最顶层viewGroup调用getParent(),返回的就是FrameLayout对象,其id是android:id=”@android:id/content”。
所以,一个Activity,里面是PhoneWindow,然后是DecorView,这个DecorView继承自FrameLayout,最后,才是我们自己setContentView的布局

VSYNC
接下来,View就显示出来了么?我们熟知的 onMeasure、onLayout 和 onDraw都还没有调用呢?看起来,我们需要一个时机来触发 View 的操作。
这个就得说下垂直同步机制(VSYNC):
VSYNC 就是一种同步机制,以某种固定的频率进行同步,当其他组件收到这个同步信号时,就执行相应的操作。设想一下,如果没有这个同步机制,各个模块又怎能知道在哪个时候去执行自己的工作了? 这里可以初步地将 VSYNC 当做闹钟,每间隔固定时间,就响一次,其他组件听到闹铃后,就开始干活了。这个间隔的时间,与屏幕刷新频率有关,例如大多数 Android 设备的刷新频率是 60 FPS(Frame per second),一秒钟刷新60次,因而间隔时间就是 1000 / 60 = 16.667 ms。这个时间,大家是不是很熟悉了?看过太多性能优化的文章,都说每一帧的绘制时间不要超过 16 ms,其背后的原因就是这个。绘制每一帧对应的 View,这个步骤发生在 UI 线程上,所以也不要在 UI 线程上进行耗时的操作,否则就可能在 16 ms内,无法完成界面更新操作了。
长话短说,总结一下,当 Choreographer 接收到 VSYNC 信号后,ViewRootImpl 调用 scheduleTraversals 方法,通知 View 进行相应的渲染,其后 ViewRootImpl 将 View 添加或更新到 Window 上去,并会执行TraversalRunnable 的doTraversal(),会调用到 performTraversals(),这是一个非常长的方法,里面就会提到我们熟悉的Measure、Layout 和 Draw。
measure()和onMeasure()
performTraversals() 会调用到 performMeasure()方法:// ViewRootImpl中:
private void performMeasure(int childWidthMeasureSpec, int childHeightMeasureSpec) {
Trace.traceBegin(Trace.TRACE_TAG_VIEW, "measure");
try {
mView.measure(childWidthMeasureSpec, childHeightMeasureSpec);
} finally {
Trace.traceEnd(Trace.TRACE_TAG_VIEW);
}
}
这里的mView就是DecorView,但measure()方法View的,并且有final修饰,不能复写,在这个方法中调用了onMeasure()。
在View中有默认的onMeasure实现:
protected void onMeasure(int widthMeasureSpec, int heightMeasureSpec) { |
getSuggestedMinimumWidth(),如果背景为空,那么我们直接返回mMinWidth最小宽度,否则,就在mMinWidth和背景最小宽度之间取一个最大值,getSuggestedMinimumHeight类同,mMinWidth和mMinHeight默认都是0。
getDefaultSize()中,当模式为AT_MOST和EXACTLY时均会返回解算出的测量尺寸,这里的specSize是。
FrameLayout的onMeasure方法
|
measureChildWithMargins是ViewGroup的方法,并且调用了child.measure方法。FrameLayout继承子ViewGroupprotected void measureChildWithMargins(View child,
int parentWidthMeasureSpec, int widthUsed,
int parentHeightMeasureSpec, int heightUsed) {
final MarginLayoutParams lp = (MarginLayoutParams) child.getLayoutParams();
final int childWidthMeasureSpec = getChildMeasureSpec(parentWidthMeasureSpec,
mPaddingLeft + mPaddingRight + lp.leftMargin + lp.rightMargin
+ widthUsed, lp.width);
final int childHeightMeasureSpec = getChildMeasureSpec(parentHeightMeasureSpec,
mPaddingTop + mPaddingBottom + lp.topMargin + lp.bottomMargin
+ heightUsed, lp.height);
child.measure(childWidthMeasureSpec, childHeightMeasureSpec);
}
总结:当FrameLayout的宽或高属性为Wrap_content属性时,同时有两个及以上的子view属性为match_parent时,则所有子view会measure两次
FrameLayout什么情况下子view会measure两次?
需要满足两个条件:1.FrameLayout自身的MeasureSpec.Mode 不等于 MeasureSpec.EXACTLY。2.有两个或以上子view设置了match_parent
为什么这种情况FrameLayout会测量两次呢?我们先看下面这个问题:
获取ChildMeasureSpec时,FrameLayout 与 RelativeLayout 区别
这里还有一个问题:getChildMeasureSpec是ViewGroup的静态方法,但是getChildMeasureSpec方法会改变子view的 MeasureSpec.Mode。
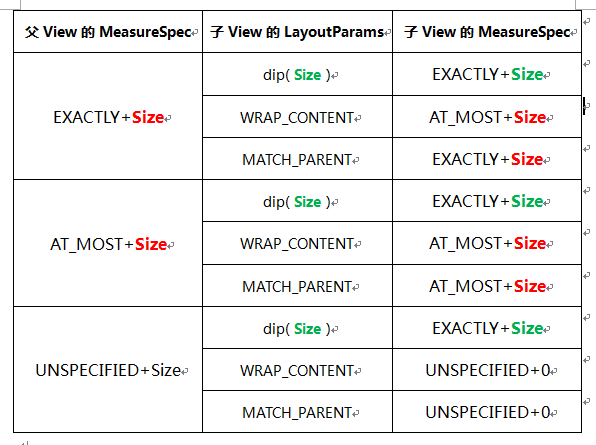
如果FrameLayout的SpecMode是AT_MOST或UNSPECIFIED,而子view的layout属性时MATCH_PARENT或WRAP_CONTENT,则子view的SpecMode会变成和父view一样
注意看下面代码的注释1和注释2public static int getChildMeasureSpec(int spec, int padding, int childDimension) {
// 获取父容器(这里指的是FrameLayout)的测量模式和尺寸大小
int specMode = MeasureSpec.getMode(spec);
int specSize = MeasureSpec.getSize(spec);
// 这个尺寸应该减去内边距的值
int size = Math.max(0, specSize - padding);
// 声明临时变量存值
int resultSize = 0;
int resultMode = 0;
switch (specMode) {
case MeasureSpec.EXACTLY: // 父容器尺寸大小是一个确定的值
if (childDimension >= 0) { //如果childDimension是一个具体的值 那么就将该值作为结果
resultSize = childDimension;
// 而这个值也是被确定的
resultMode = MeasureSpec.EXACTLY;
} else if (childDimension == LayoutParams.MATCH_PARENT) { //如果子元素的布局参数为MATCH_PARENT
// 那么就将父容器的大小作为结果
resultSize = size;
// 因为父容器的大小是被确定的所以子元素大小也是可以被确定的
resultMode = MeasureSpec.EXACTLY;
} else if (childDimension == LayoutParams.WRAP_CONTENT) { //如果子元素的布局参数为WRAP_CONTENT
// 那么就将父容器的大小作为结果
resultSize = size;
// 但是子元素的大小包裹了其内容后不能超过父容器
resultMode = MeasureSpec.AT_MOST;
}
break;
case MeasureSpec.AT_MOST: // 父容器尺寸大小拥有一个限制值
if (childDimension >= 0) { //如果childDimension是一个具体的值
// 那么就将该值作为结果
resultSize = childDimension;
// 而这个值也是被确定的
resultMode = MeasureSpec.EXACTLY;
} else if (childDimension == LayoutParams.MATCH_PARENT) {
//如果子元素的布局参数为MATCH_PARENT,那么就将父容器的大小作为结果
resultSize = size;
// 注释1:因为父容器的大小是受到限制值的限制所以子元素的大小也应该受到父容器的限制
resultMode = MeasureSpec.AT_MOST;
} else if (childDimension == LayoutParams.WRAP_CONTENT) { //如果子元素的布局参数为WRAP_CONTENT
// 那么就将父容器的大小作为结果
resultSize = size;
// 但是子元素的大小包裹了其内容后不能超过父容器
resultMode = MeasureSpec.AT_MOST;
}
break;
case MeasureSpec.UNSPECIFIED: // 父容器尺寸大小未受限制
if (childDimension >= 0) {
//如果childDimension是一个具体的值,那么就将该值作为结果
resultSize = childDimension;
// 而这个值也是被确定的
resultMode = MeasureSpec.EXACTLY;
} else if (childDimension == LayoutParams.MATCH_PARENT) { //如果子元素的布局参数为MATCH_PARENT
// 注释2:因为父容器的大小不受限制而对子元素来说也可以是任意大小所以不指定也不限制子元素的大小
resultSize = 0;
resultMode = MeasureSpec.UNSPECIFIED;
} else if (childDimension == LayoutParams.WRAP_CONTENT) { //如果子元素的布局参数为WRAP_CONTENT
// 因为父容器的大小不受限制而对子元素来说也可以是任意大小所以不指定也不限制子元素的大小
resultSize = 0;
resultMode = MeasureSpec.UNSPECIFIED;
}
break;
}
// 返回封装后的测量规格
return MeasureSpec.makeMeasureSpec(resultSize, resultMode);

回答上面问题,为什么这种情况FrameLayout的子view会测量两次?
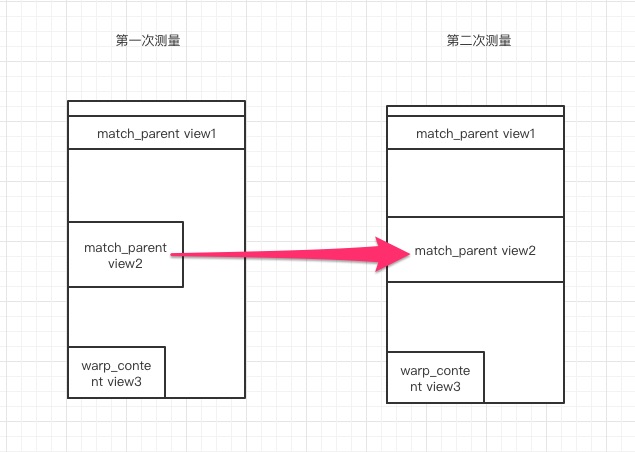
先看下图:
以宽度为例说明,因为FrameLayout可能包含多个子view,第一次测量后,设置了match_parent的view1和view2变为wrap_content,child.getMeasuredWidth为wrap_content的宽度,即子view自己的宽度。
由于有多个match_parent的子view,父view需要重新调整自己的宽度为最大的子view的宽度,所以所有的子view需要在根据父view的宽度重新调整一下自己的宽度,最终导致子view measure两次。
多说一句,RelativeLayout并没有用这个方法,而是自定义了一个getChildMeasureSpec()方法,所以RelativeLayout与FrameLayout表现上是不一样的。
感兴趣的可以在Android Studio里修改一下下面布局,替换RelativeLayout和FrameLayout,试一下看下效果:
<RelativeLayout xmlns:android="http://schemas.android.com/apk/res/android" |
Ref
自定义View —— onMeasure、 onLayout
本文链接:http://agehua.github.io/2019/12/09/Android-Measure/


